Housing System
Basic Guidelines
A player home must contain at least the following things:
- 1 2x2 area made of one of the allowed tilesets.
- A door with the tag "MAIN_DOOR" that will be used to leave the house.
- Choose a specific loading screen. (The default the loading screen is set to random, which is bad.)
You can then choose the area lightning and ambient music that you want, add placeables, sounds, more doors, waypoints, triggers, visual effects and more!
Each area can have up to 1500 objects and 250 of them can be dynamic, a dynamic object is either a non-static placeable, a door, a trigger or a visual effect. Sinfar Supporters limit is twice that amount (500 dynamic and 3000 static).
(You may not put in your own items or creatures, or any merchants or scripts beyond those supported on Sinfar's houses script list page.)
Acquiring a House
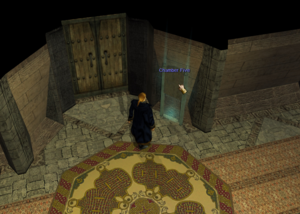
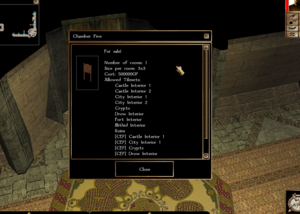
- Find a location: Player houses are characterized by a sign with a title such as "House #5", next to a door and the sign should say "For sale!" with the details on how the interior can be designed, for example:


- Go the the realtor: There's one for most islands or you can cheat and use the one in the OOC which is for all islands: https://www.youtube.com/watch?v=2q-MsU8YXZ0
Building Your House
Open the Editor
The interior of you house can be built using the Neverwinter Nights Toolset.
You can start building with this module: Sinfar v30 home module
- Extract the module to your NWN\modules folder.
- Extract the hak to your NWN\hak folder.
Create the First Area
- Select one of the allowed tileset.
- Select a size within the allowed range (the format on the deed is: Width x Height).
- Add a door and set the tag to "MAIN_DOOR". This is the door that will be used to enter and leave the house, you don't have anything else to do, its transition will be setup automatically. It can have a custom appearance and the exterior door will be updated to have the same appearance.
Upload the Module
Save the module, upload it:
- Open the House Upload Page.
- Enter your house ID and secret code, both can be found by examining your deed in game.
- Select your house module, it should be in your NWN\modules folder. You can optionally compress it.
- Click the Upload button.
The server will process your module, validate all areas and strip everything that is not allowed and if everything goes well, you will get a message saying that your house is now in game.
Here's what the process looks like: https://www.youtube.com/watch?v=2xAte-Rm7Bg
Alternative Upload an ERF
You can also upload an ERF rather than the whole module, this has advantages in that the upload is smaller (only includes the specific area resources you exported), and you can carry on editing with less interruption.
The process is largely the same when it comes to the upload of your home to the server using the instructions above, but instead of uploading the .mod file you'll be uploading a .erf file.
To create an ERF file of your areas with the editor open; open the File menu, and select Export, a new window will open to 'Export Resources', click 'Add Resources' which then opens up a resource selection window, if necessary at the bottom change the 'Resources of Type:' selector from to 'Area File', and then select the areas you wish to export, and click 'Export' which will close the selctor dialog, once you have all the areas you wish to export listed, click 'OK' and you will be prompted to save the created '.erf' file. After you have chosen the save filename and location you'll be prompted to add any comments to the ERF, you can click 'OK' again to leave the comments field empty.
Using Scripts
Default Scripts
Some objects will have a default scripts attached to them:
- Plot placeable with an inventory will have a script to make their inventory persistent
Approved Scripts
You can use any of the scripts that are listed here: Scripts for houses, with the following restrictions:
- You can only use one script per object
- When an object is using a script from this list, it will not have a default script, so for example, a plot placeable with an inventory won't be persistent... if it is using one of those scripts.
- Each script has a specific list of variable and any other variable name/type will be automatically removed
- Make sure to read the script description, some require that placeable by dynamic, some can only be use a certain number of time...
You can find more details here: Custom Scripting.
How to Make Scripts, Dialogs, Creatures and Other Restricted Blueprints for inside Your House
The housing system is made so that you can even make your own scripts for inside your house and they will have no effect outside of it when ran. This feature is although restricted to selected players and Sinfar Supporters.
Read more here: https://sinfar.net/features/housing/custom_scripts
Sinfar Home Builders Guide
The Sinfar player home building guide may be found here: Sinfar Home Builder's Guide
Avaliable Tilesets
+ Caves/Dungeons Classic Dungeon = cdlif; Dungeon [CEP] = tde01; Dwarven Chasms = isc04; Eye of the Beholder = tei01; Mines and Caverns [CEP] = tdm01; Sea Caves = tdt01; Sen's Icy Caverns = sic01; Sen's Mines and Caverns = scv01; Sen's Underdark = sdg01; Underdark [CEP] = ttu01; Versatile Dungeon = tvd;
+ Catacombs/Sewers Catacombs = twl04; Sewers = tds01; Steamworks = tsw01; Undercity Sewer = isc02;
+ Barrows/Crypts/Ruins Barrows Interior = tbw01; Beholder Interior [CEP] = tib01; Crypts [CEP] = tdc01; Deep Dungeon = isc01; Ruins = tdr01;
+ Exterior Wild/Rural Barren Lands = isc03; Desert [CEP] = ttd01; Desert, Babylon [CTP] = tced0; Forest [CEP] = ttf01; Frozen Waste [CEP] = tti01; Medieval Forest = tfm01; Rural Grass [CEP] = ttr01; Rural Winter [CEP] = tts01; Swamps [CEP] = zkw01; Tropical = ttz01; Urban Wasteland = wlu01; Wild Woods = ttw01; Wildlands = twl01; Wildlands Winter = twl02; Worms Cypress Bayou = wcs10; Worms Dense Jungle = wdj01; Worms Desert Plains = wdp01; Worms Fantasy Interiors = wdd04; Worms Forest Summer = wsf10; Worms Jungle Mountains = tjj01; Worms Mirkwood Swamps = wms01; Worms Outer Limits = wcc01; Worms Scorched Earth = wlf01; Worms Undersea = wut01;
+ Exterior City/Town Aztec Exterior = tze01; Castle Exterior, Rural = tno01; City Exterior [CEP] = tcn01; Complete Rural/City = tcr10; Elven Treetop City = thf02; Gothic Estates = gg; Medieval City = tcm01; Medieval Rural = trm01; Modern Suburbs = udp1; Oriental Rural = ori01; Sigil, Exterior [CODI] = tps01;
+ Housing Interior Castle Interior 1 [CEP] = tic01; Castle Interior 2 = tni02; City Interior 1 [CEP] = tin01; City Interior 2 = tni01; Drow Interior [CEP] = tid01; Elven Interiors, Marble = bvi80; Elven Interiors, Wooden = pie23; Fancy Castle = fla01; Fort Interior = twc03; Gothic Interior = gi; Illithid Interior = tii01; Medieval Keep Interior = tei02; Modern Office Interiors = udp2; NWN2 Houses = tms02; Oriental Interior = ori02; Sen's Rural Inn = sic11; Sigil, Stern Interior [CODI] = thv01; SJ Wood Interior = tis01; White Marble Castle = mbc30; Workshop = wks01;
+ Misc Arena = tte30; Future, Secret Base = tcdh0; PHoD Bunker 1 = fifi1; PHoD Bunker 2 = fifi2; PHoD Bunker 3 = fifi3 PHoD Metal Vault Interior = mbc31; PHoD Metal Wasteland 1 = tsr02; PHoD Vault - Ancient = phodd; PHoD Vault - Exotic = phoda; PHoD Vault - Lumpy = phode; PHoD Vault - Murky = phodf; PHoD Vault - Strange = phodb; PHoD Vault - Tainted = phodc; Ship Interior = nex01; Starship Interiors = shp02; Worms Wagon Travel Interior = tms01;